Published on: January 27, 2026
23 min read
How to set up GitLab SAML SSO with Google Workspace
Learn how to automate user provisioning and sync permissions with Google groups with this step-by-step guide.

Single sign-on (SSO) simplifies user authentication and improves security by allowing employees to access multiple applications with one set of credentials. For organizations using both GitLab and Google Workspace, integrating SAML-based SSO streamlines access management and ensures your teams can collaborate seamlessly.
In this guide, we'll walk through configuring SAML authentication between Google Workspace and GitLab.com, including automatic group synchronization that maps Google Workspace groups to GitLab roles. By the end, your users will be able to sign in to GitLab using their Google credentials, and their permissions will automatically reflect their Google group memberships.
Note: This guide focuses on GitLab.com (SaaS). If you're using GitLab Self-Managed, the setup process differs slightly. Refer to the official GitLab SAML documentation for self-managed instances for detailed instructions.
What you'll need
Before getting started, make sure you have:
- Google Workspace with Super Admin access
- GitLab.com with a Premium or Ultimate tier subscription
- Owner role on a GitLab top-level group
- Users already existing in Google Workspace (they'll be created in GitLab automatically on first login)
Understanding the architecture
When you configure SAML SSO with group synchronization, here's what happens:
- Authentication flow: Users navigate to GitLab's SSO URL and are redirected to Google Workspace to authenticate.
- SAML assertion: After successful authentication, Google sends a SAML response containing user details and group memberships.
- Automatic provisioning: GitLab creates the user account (if needed) and assigns them to groups based on their Google group memberships.
- Permission sync: Each time users sign in, GitLab updates their group memberships and roles to match their current Google groups.
This setup provides several benefits:
- Centralized access control: You can manage user access through Google Workspace groups.
- Automatic provisioning: New users gain GitLab access on their first login.
- Dynamic permissions: User roles update automatically based on group membership changes.
- Enhanced security: You can leverage Google's authentication security features.
- Reduced administrative overhead: There is no need to manually manage GitLab group memberships.
Part 1: Get your GitLab SAML configuration values
First, you'll need to gather some information from GitLab that you'll use when creating the SAML application in Google Workspace. Here are the steps to take:
Step 1: Navigate to your GitLab group SAML settings
- Sign in to GitLab.com.
- Navigate to your top-level group (Note: SAML SSO can only be configured at the top-level group, not in subgroups).
- In the left sidebar, select Settings > SAML SSO.
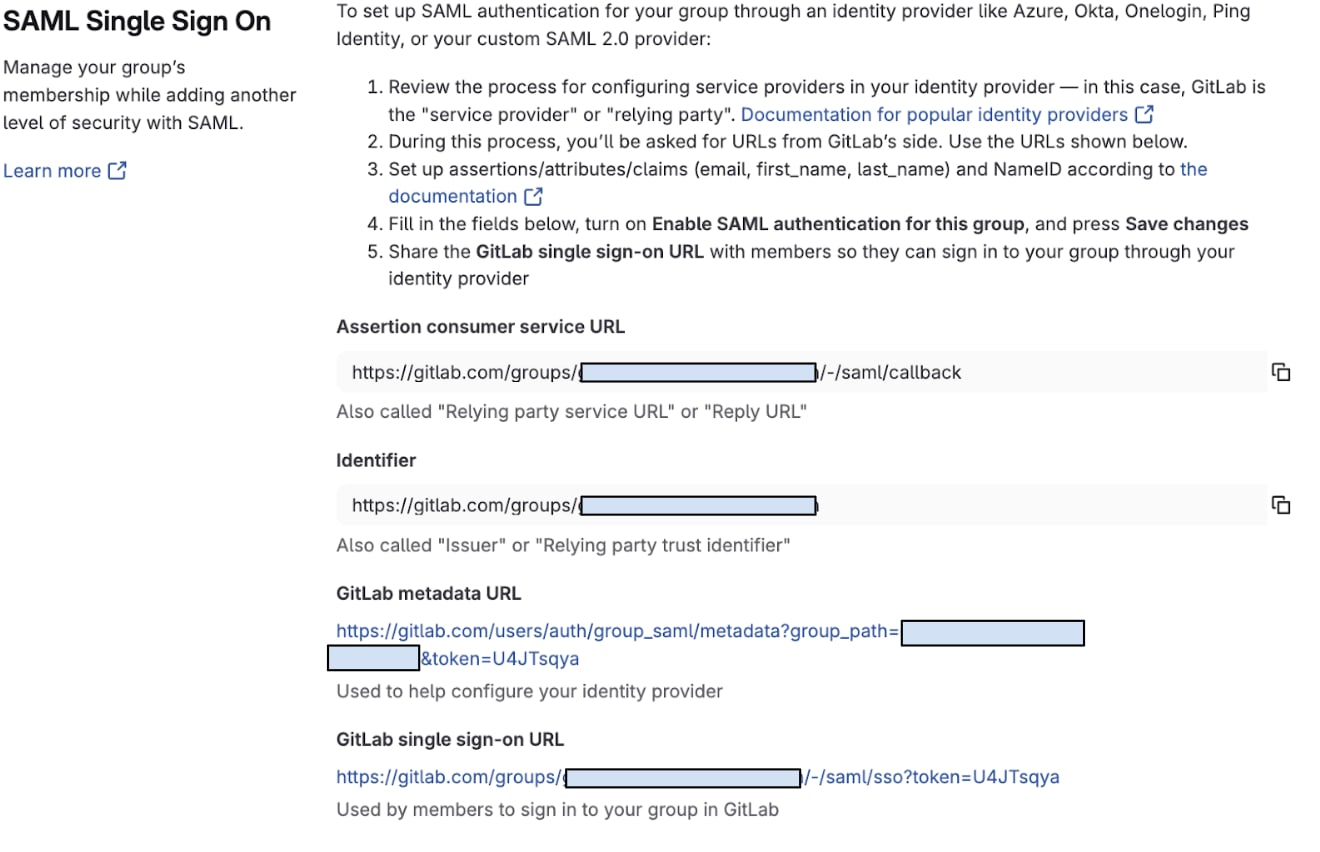
Step 2: Copy the required URLs
On the SAML SSO settings page, you'll see three important URLs. Copy and save these somewhere accessible — you'll need them shortly:
- Assertion consumer service URL: This is where Google will send SAML responses.
- Format:
https://gitlab.com/groups/your-group/-/saml/callback
- Format:
- Identifier: Also called the Entity ID, this uniquely identifies your GitLab group.
- Format:
https://gitlab.com/groups/your-group
- Format:
- GitLab SSO URL: This is the URL your users will use to sign in.
- Format:
https://gitlab.com/groups/your-group/-/saml/sso
- Format:
Now you'll create a custom SAML application in Google Workspace that connects to your GitLab group.
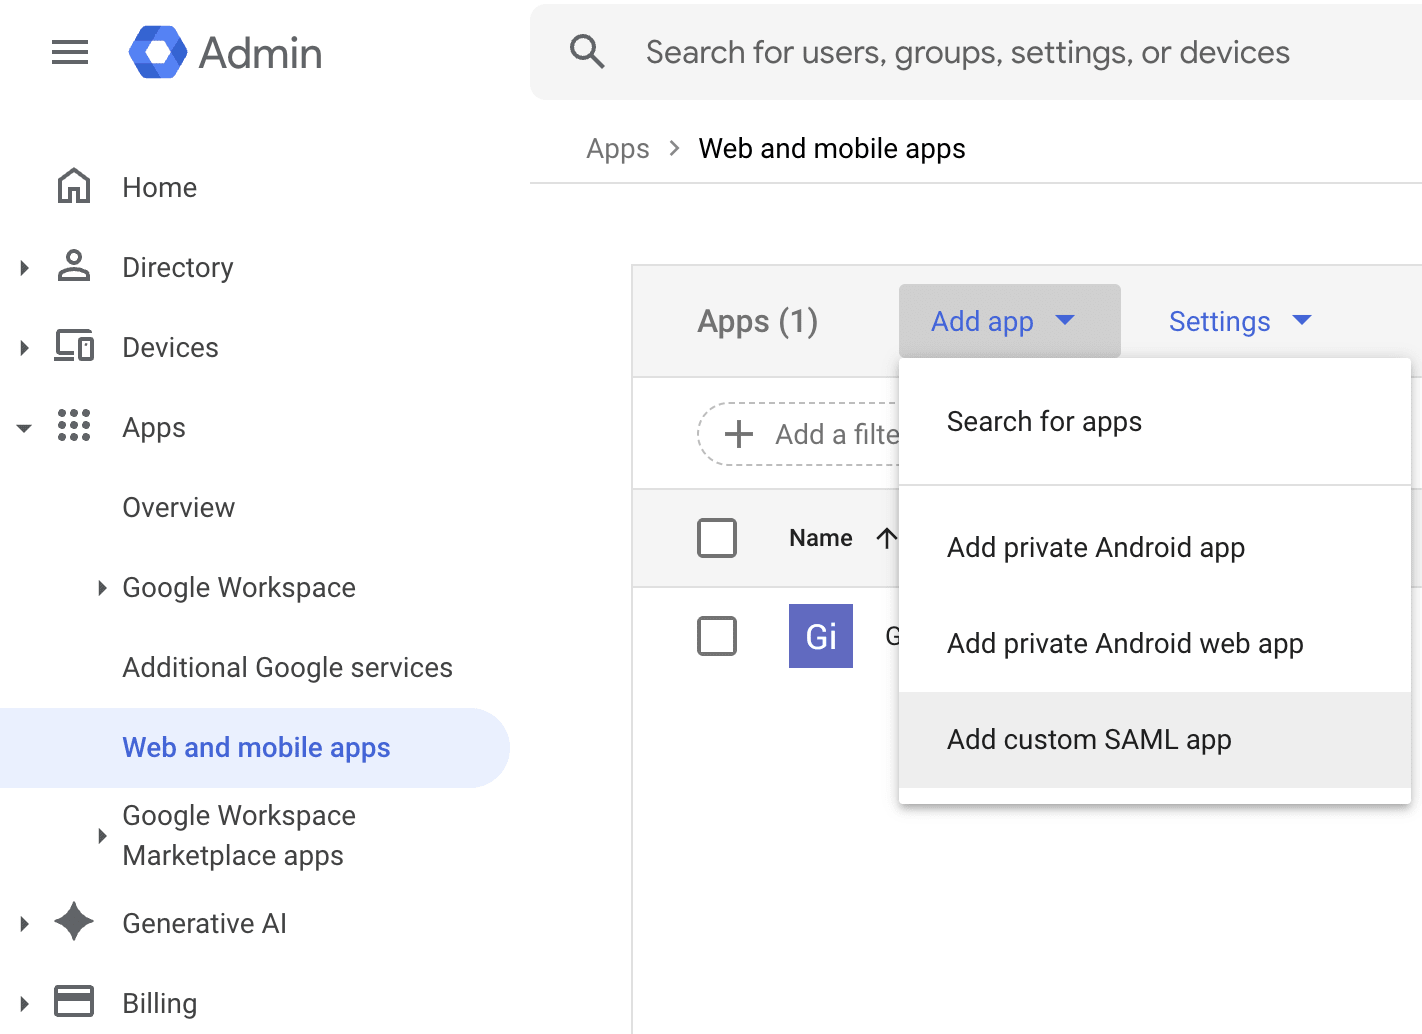
Step 3: Access the Google Admin Console
- Open a new browser tab and sign in to the Google Admin Console with a Super Administrator account.
- Click the Menu icon (☰) in the top-left.
- Navigate to Apps > Web and mobile apps.
- Click Add App > Add custom SAML app.
Step 4: Configure the application name
- In the App name field, enter GitLab (or your preferred name).
- Optionally upload a GitLab logo as the app icon for easy recognition.
- Click Continue.
Step 5: Download Google identity provider details
On the Google Identity Provider details page, you'll need to capture two pieces of information:
- SSO URL: Copy this URL. It tells GitLab where to send authentication requests.
- Example format:
https://accounts.google.com/o/saml2/idp?idpid=C1234abcd
- Example format:
- Certificate: Click the Download button to save the certificate file.
- The file will be named something like:
GoogleIDPCertificate-gitlab.pem - Save this file somewhere you can easily find it. You'll need it in the next section
- The file will be named something like:
- Click Continue.
Step 6: Configure service provider details
This is where you'll use the GitLab URLs you copied in Step 2. Enter the following:
| Field | Value | Description |
|---|---|---|
| ACS URL | Your GitLab Assertion consumer service URL | Where Google sends SAML responses |
| Entity ID | Your GitLab Identifier | Unique identifier for your GitLab group |
| Start URL | Leave blank | Not required for this setup |
| Name ID format | Select EMAIL | The format for the user identifier |
| Name ID | Select Basic Information > Primary Email | The user's primary email will be used as their identifier |
| Signed response | Leave unchecked | GitLab doesn't require signed responses by default |
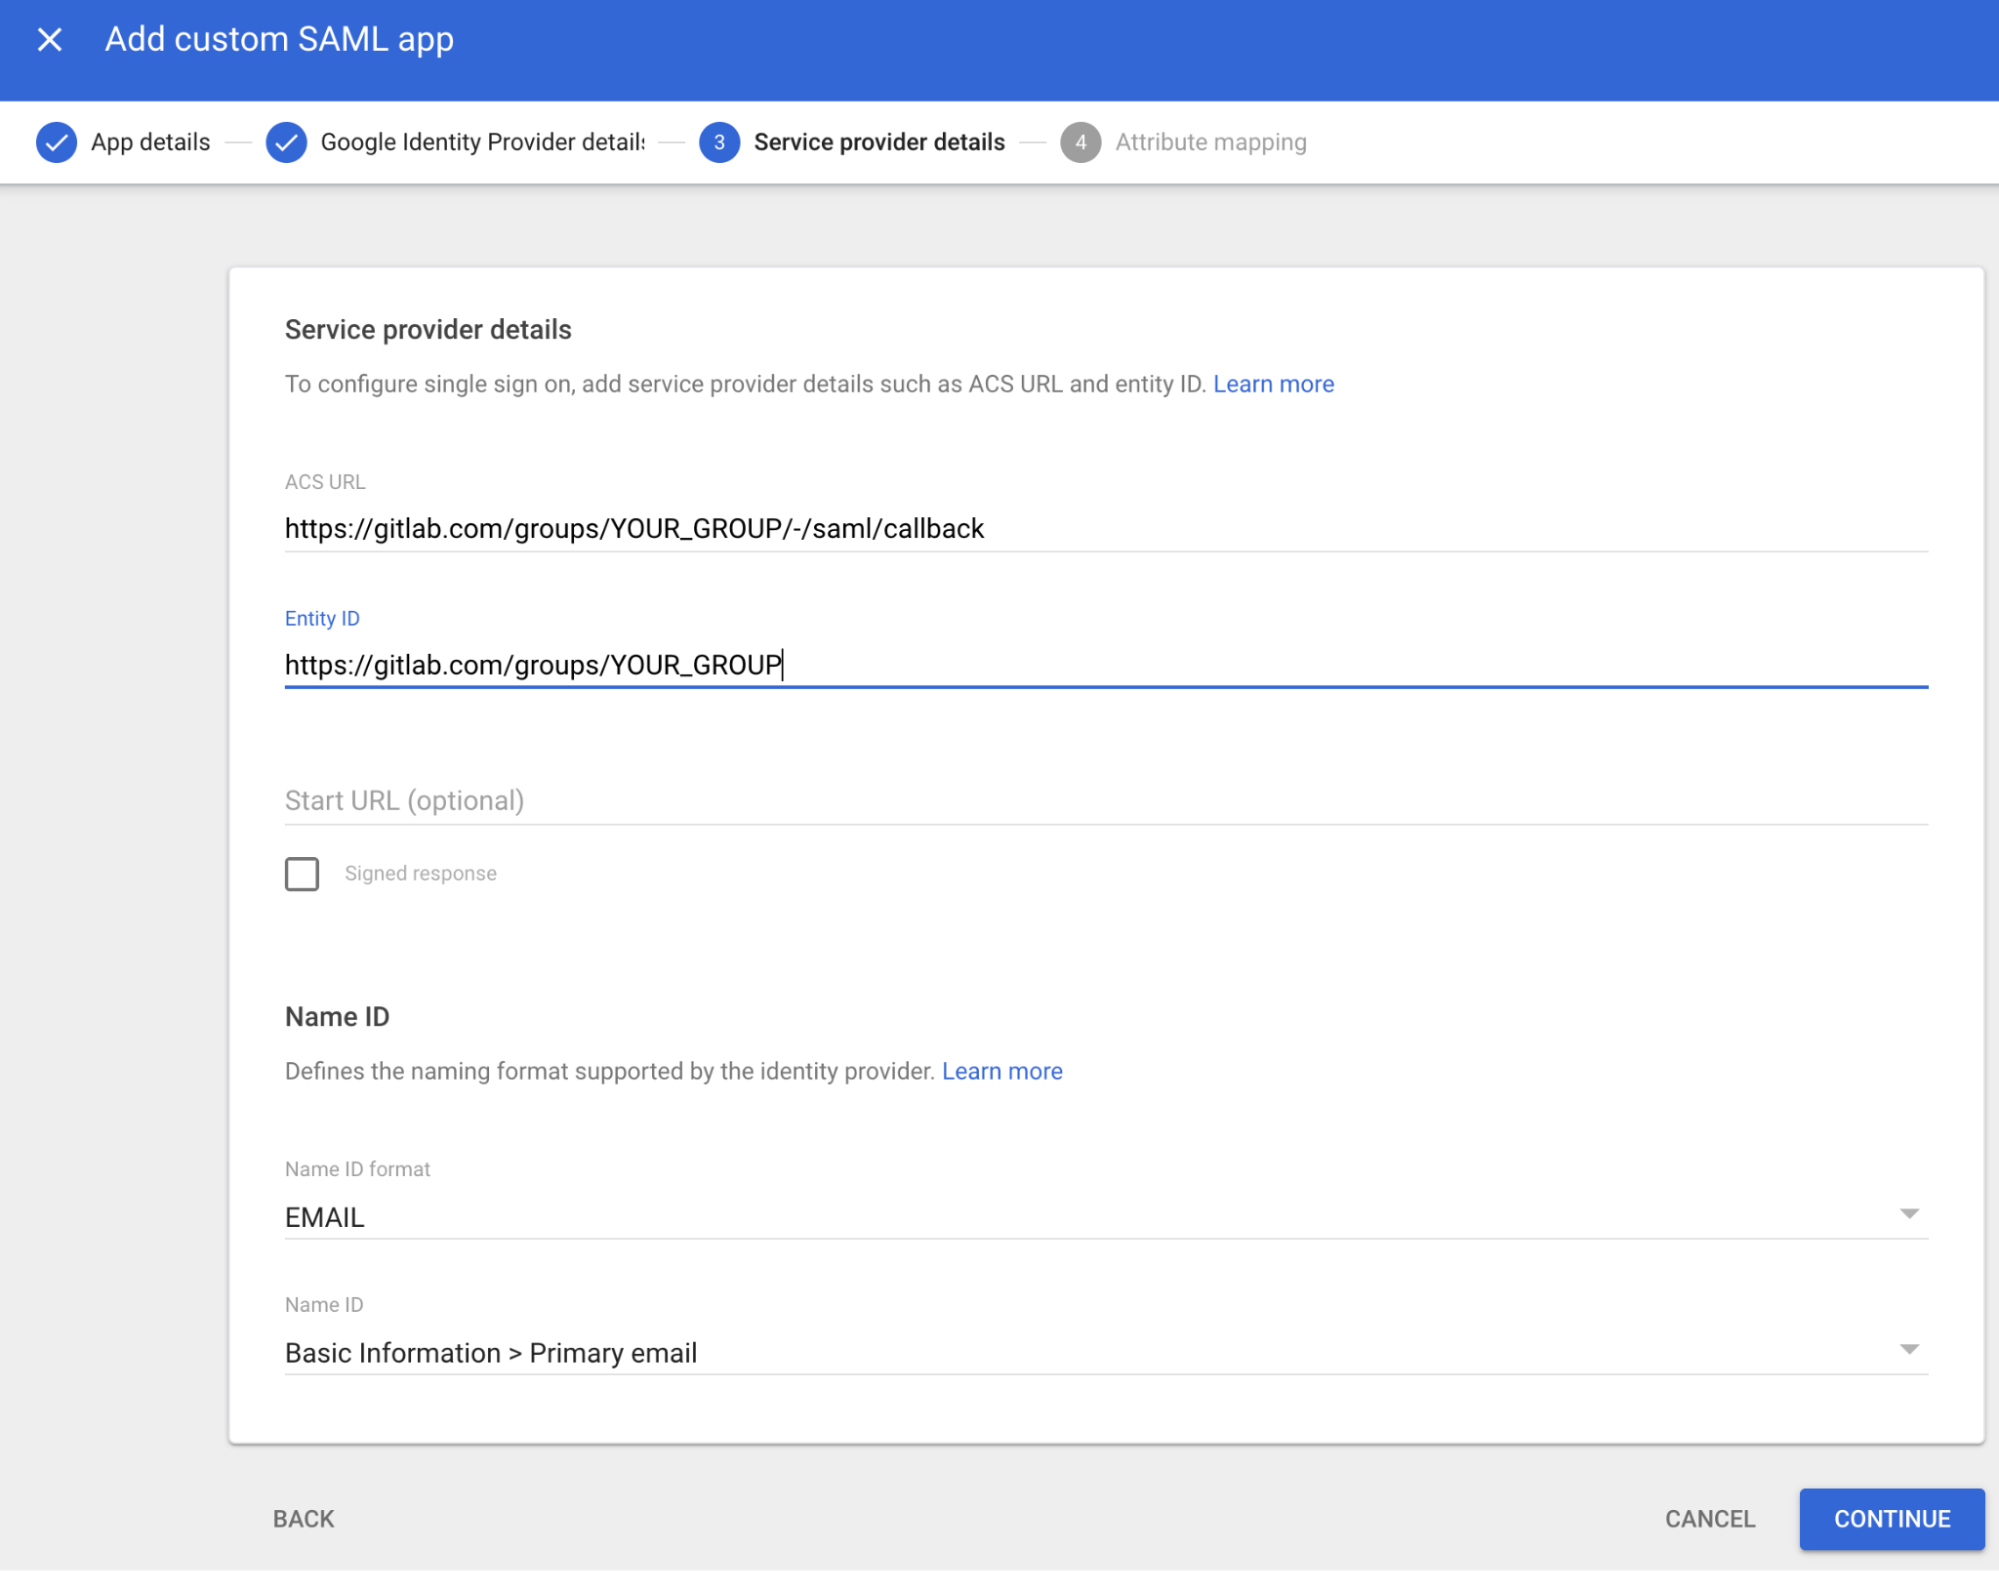
Click Continue when complete.
Step 7: Configure attribute mapping
Attribute mapping tells Google which user information to send to GitLab. You'll configure both basic user attributes and group membership.
Basic attributes
Add these three attribute mappings by clicking Add mapping for each:
| Google Directory attribute | App attribute |
|---|---|
| Primary email | |
| First name | first_name |
| Last name | last_name |
Group membership configuration
This is the critical configuration that enables automatic group synchronization:
- Scroll down to the "Group membership (optional)" section.
- Under "Google groups", click "Search for a group".
- Search for and select each Google Workspace group you want to synchronize with GitLab.
- You can select up to 75 groups
- Examples: Engineering, DevOps, Platform-Team, Security-Team
- Under "App attribute", enter exactly:
groups. - Click Finish.
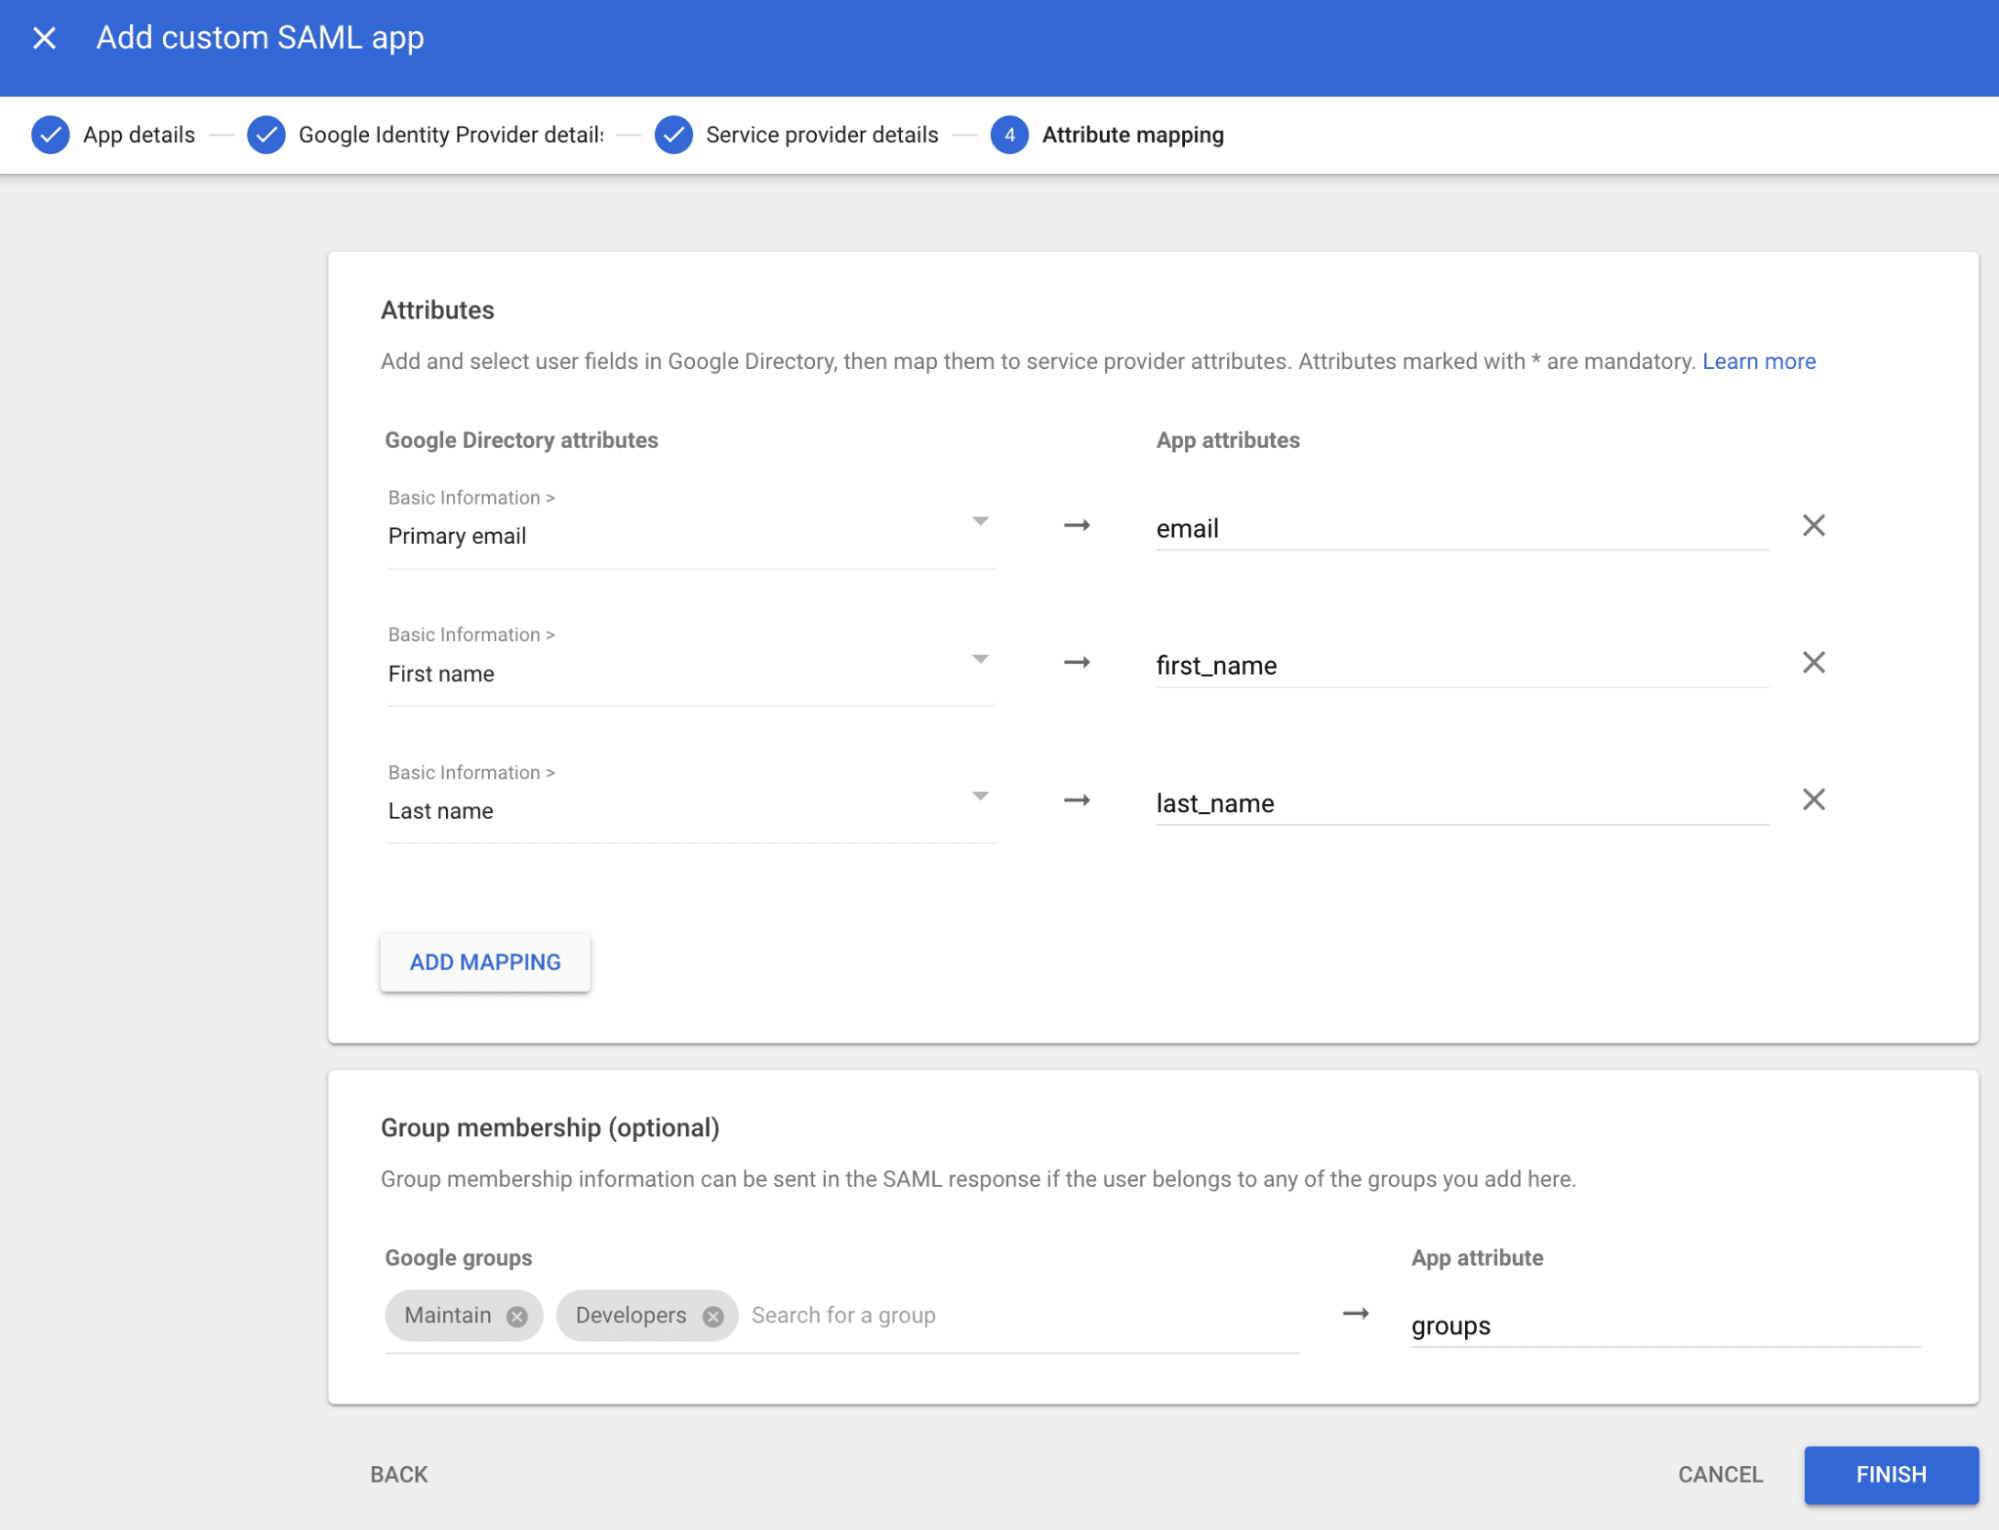
Critical: The app attribute name MUST be exactly
groups(lowercase). This is what GitLab expects to receive in the SAML response. Any other value or capitalization will prevent group synchronization from working.
Step 8: Enable the application for users
Your SAML app is created but not yet enabled. To make it available to users:
- In the Google Admin Console, find your GitLab app in the Web and mobile apps list.
- Click on the app to open its details.
- In the left sidebar, click User access.
- Select one of the following:
- ON for everyone - Enables the app for all users in your organization
- ON for some organizational units - Select specific organizational units
- Click Save.
Note: Changes can take up to 24 hours to propagate, but typically take effect within a few minutes.
Part 3: Convert the certificate to SHA-1 fingerprint format
GitLab requires a SHA-1 certificate fingerprint, but Google's certificate download doesn't include this format directly. You'll need to convert it.
Step 9: Convert your certificate
You have two options for converting the certificate to the required format.
Option 1: Online conversion tool
This is a viable method if you're comfortable using a third-party tool:
- Locate the certificate file you downloaded in Step 5:
- Check your Downloads folder
- The file name will be something like:
GoogleIDPCertificate-gitlab.pem
- Open the file in a text editor:
- Mac: Right-click > Open With > TextEdit
- Windows: Right-click > Open With > Notepad
- Linux: Use your preferred text editor
- Copy ALL contents of the file, including the header and footer:
      -----BEGIN CERTIFICATE-----
MIIDdDCCAlygAwIBAgIGAXqD...
(multiple lines of encoded text)
...kE7RnF6yQ==
-----END CERTIFICATE-----
- Navigate to: A SHA-1 fingerprint conversion tool. This one is a good example.
- Paste the certificate content into the text box.
- Select "SHA-1" from the algorithm dropdown (not SHA-256!).
- Click "Calculate Fingerprint".
- Copy the resulting fingerprint - it will be in the format:
XX:XX:XX:XX:XX:....
Option 2: Command-line conversion
If you prefer using the command line:
For Mac, Linux, or Windows with WSL:
      cd ~/Downloads
openssl x509 -noout -fingerprint -sha1 -inform pem -in "GoogleIDPCertificate-gitlab.pem"
The output will show:
SHA1 Fingerprint=XX:XX:XX:XX:XX:XX:XX:XX:XX:XX:XX:XX:XX:XX:XX:XX:XX:XX:XX:XX
Copy everything after SHA1 Fingerprint=.
Part 4: Complete your GitLab SAML configuration
Now that you have the Google SSO URL and certificate fingerprint, you can complete the GitLab side of the configuration.
Step 10: Enter Google identity provider details
Return to your GitLab browser tab (Settings > SAML SSO) and do the following:
- Identity provider SSO URL:
- Paste the SSO URL you copied from Google in Step 5
- Certificate fingerprint:
- Paste the SHA-1 fingerprint you generated in Step 9
- Verify the format is correct: 59 characters with colons (XX:XX:XX:...)
- Enable SAML authentication for this group:
- Check this box to activate SAML SSO
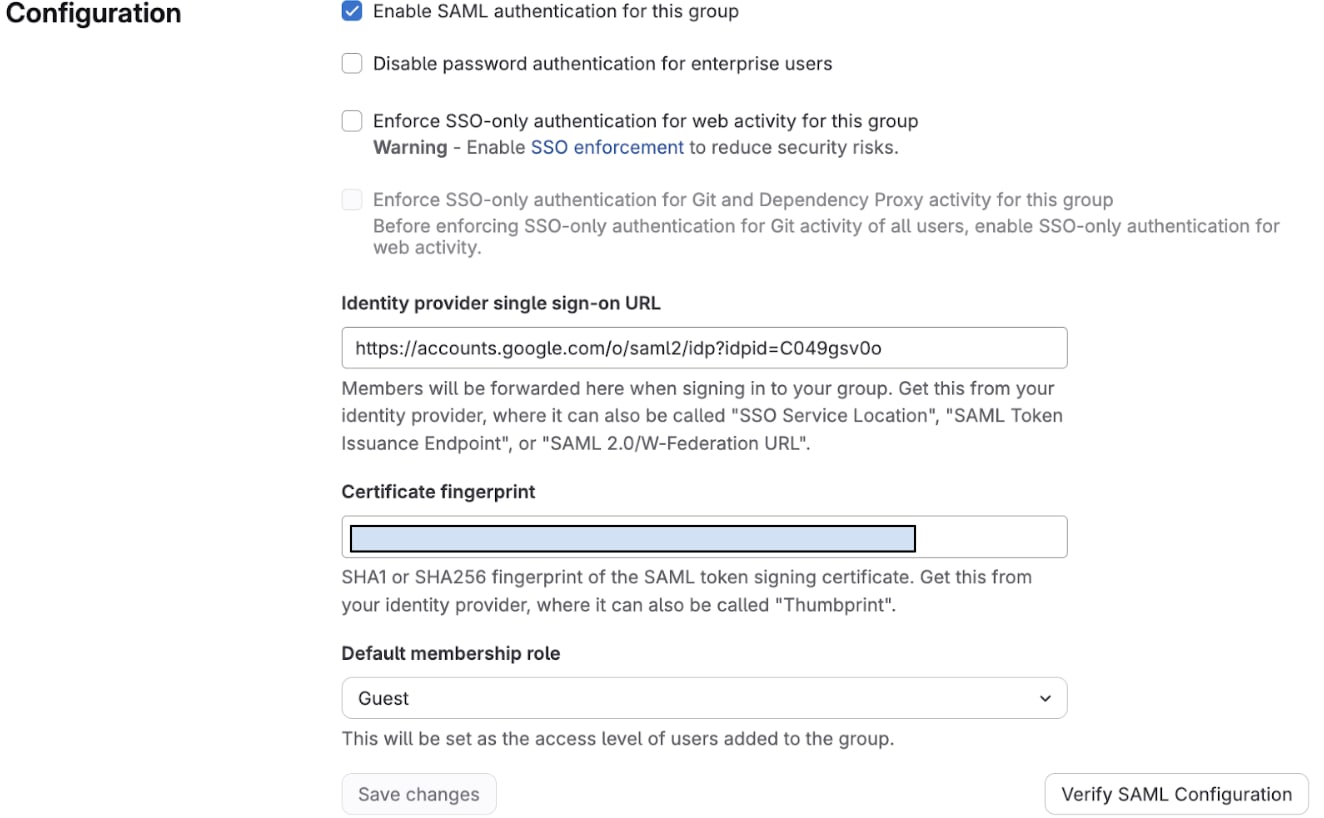
Step 11: Configure security settings (recommended)
For enhanced security, consider enabling these additional options:
- "Enforce SAML authentication for web activity for this group"
- Requires users to authenticate via SAML to access the GitLab web interface
- "Enforce SAML authentication for Git and Dependency Proxy activity for this group"
- Requires SAML authentication for Git operations and dependency proxy access
Click Save changes to apply your configuration.
Step 12: Test your SAML configuration
Before proceeding with group synchronization, verify that basic SAML authentication works:
- Open an incognito or private browsing window.
- Navigate to your GitLab SSO URL.
- Format:
https://gitlab.com/groups/your-group/-/saml/sso
- Format:
- You should be redirected to the Google sign-in page.
- Sign in with a Google Workspace account that has access to the GitLab app.
- After successful authentication, you should be redirected back to GitLab.
If the test succeeds, you can proceed to configure group synchronization.
If the test fails, check the following:
- Verify the certificate fingerprint is SHA-1 format (not SHA-256).
- Confirm the SSO URL is correct.
- Ensure the user has access to the GitLab SAML app in Google Admin Console.
- Check that the ACS URL and Entity ID match exactly.
Part 5: Set up SAML group synchronization
Now it's time to map your Google Workspace groups to GitLab roles so that permissions are automatically managed based on group membership.
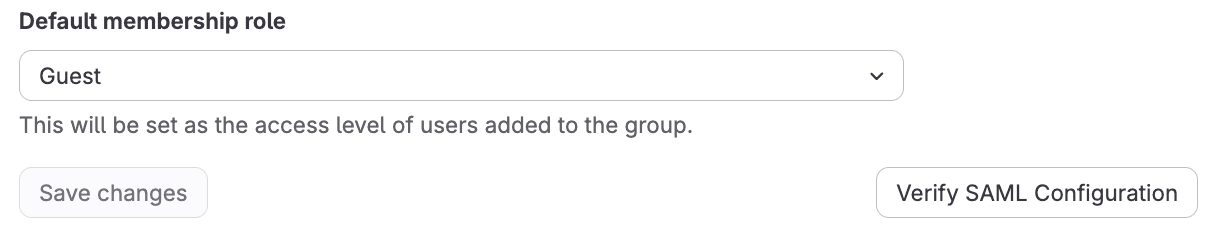
Step 13: Configure default membership role
As a security best practice, set a minimal default role for users who log in but don't belong to any mapped groups:
- In your GitLab group, navigate to Settings > General.
- Expand the Permissions and group features section.
- Under Default membership role, select Minimal Access or Guest.
- Click Save changes.
Step 14: Create SAML group links
SAML Group Links are the mappings between Google Workspace groups and GitLab roles. Here's how to create them:
- In your GitLab group, navigate to Settings > SAML Group Links.
- Click "Add new SAML Group Link".
For each Google Workspace group you want to sync:
SAML Group Name:
- Enter the exact name of your Google Workspace group
- This is case-sensitive and must match perfectly
- Example: Engineering (not engineering)
- To find the exact name: Google Admin Console > Directory > Groups
Access Level: Select the appropriate GitLab role:
- Minimal Access - Can see that the group exists
- Guest - Can view issues and leave comments
- Reporter - Can pull code, view issues, and create new issues
- Developer - Can push code, create merge requests, and manage issues
- Maintainer - Can manage project settings and members
- Owner - Full administrative control over the group
- Click Save.
- Repeat this process for each Google Workspace group you want to map.
Note: SAML group sync rules are enforced every time a user signs in. If a user's Google group membership matches a sync rule, their GitLab role will be automatically set to the configured access level, even if you've manually changed it to something different. For example, if you set up a sync rule that grants "Maintainer" access and then manually promote a user to "Owner," they'll be automatically downgraded back to "Maintainer" on their next SAML sign-in.
Best practices: To maintain custom access levels for specific users, do one of the following:
- Use SAML group sync only on your top-level group and manually manage permissions in subgroups
- Create separate Google groups for users who need elevated permissions
- Avoid setting up sync rules that would conflict with manual role assignments

Here's a practical example of how you might structure your group mappings:
| Google Workspace Group | GitLab Role | Purpose |
|---|---|---|
| GitLab-Admins | Owner | Full administrative access |
| Engineering-Team | Maintainer | Can manage projects and settings |
| Developer-Team | Developer | Can write and push code |
| QA-Team | Developer | Can test and manage issues |
| Contractors | Reporter | Read-only access to code |
| All-Employees | Minimal Access | Basic visibility |
Step 15: Verify your group links
After creating all your group links:
- Review the complete list of SAML Group Links in Settings > SAML Group Links.
- Verify each SAML Group Name exactly matches the corresponding Google Workspace group.
- Verify each Access Level is appropriate for the intended purpose.
- Check for any typos or extra spaces.
Part 6: Test the complete configuration
Now it's time to test the entire setup including group synchronization.
Step 16: Test with a real user
Choose a test user who meets these criteria:
- Has a Google Workspace account
- Is a member of at least one Google Workspace group you configured
- Has the GitLab SAML app enabled in Google Admin Console
- Ideally is not you (to ensure a realistic test)
To perform the test:
- Open an incognito or private browsing window
- Navigate to your GitLab SSO URL:
https://gitlab.com/groups/your-group/-/saml/sso
- Sign in with the test user's Google Workspace credentials
- The user should be:
- Authenticated successfully
- Redirected to GitLab
- Automatically added to the GitLab group
- Assigned the appropriate role based on their Google group membership
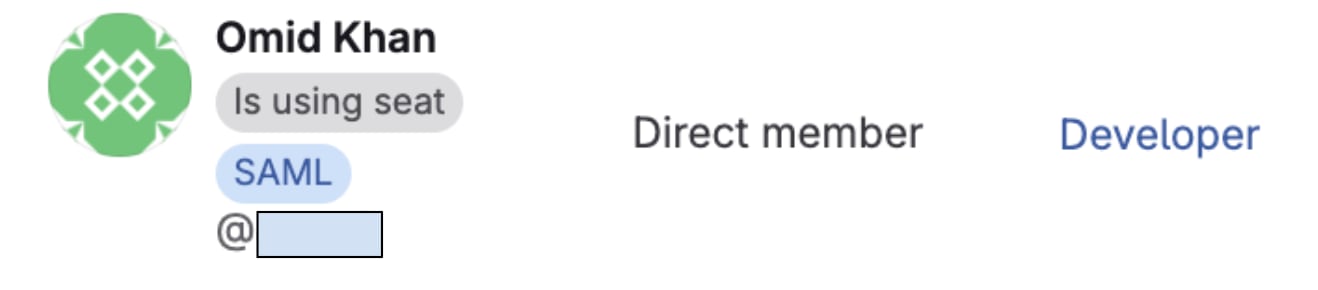
Step 17: Verify group membership and role assignment
Using your GitLab administrator account:
- Navigate to your group in GitLab.
- Select Manage > Members from the left sidebar.
- Find the test user in the members list.
- Verify the following:
- User appears in the members list
- User has the correct Max role based on their Google group(s)
- Source column shows a SAML indicator
Part 7: Configure subgroup access (optional)
For larger organizations, you may want to provide more granular access control using GitLab subgroups. SAML Group Links can be configured at any level of your group hierarchy, allowing you to map different Google Workspace groups to specific teams or projects.
Understanding GitLab's subgroup structure
GitLab supports nested group hierarchies that can mirror your organizational structure:
      acme-corp/                          ← Top-level group (SAML configured here)
├── engineering/                    ← Subgroup
│   ├── backend/                   ← Nested subgroup
│   └── frontend/                  ← Nested subgroup
├── marketing/                      ← Subgroup
└── operations/                     ← Subgroup
Creating subgroups
If you need to create additional subgroups:
- Navigate to your parent group (e.g., acme-corp).
- Click the New subgroup button.
- Configure the subgroup:
- Subgroup name: Display name (e.g., Engineering)
- Subgroup URL: URL slug (e.g., engineering)
- Visibility level: Choose Private, Internal, or Public
- Click Create subgroup.
- Repeat for other subgroups as needed.
Configuring SAML group links for subgroups
Here are the steps to configure SAML group links for subgroups.
Add new Google groups to the SAML app (if needed)
If you're introducing new Google Workspace groups for subgroup access:
- Go to Google Admin Console > Apps > Web and mobile apps > GitLab.
- Click SAML attribute mapping.
- Scroll to "Group membership (optional)".
- Add your new groups (e.g., Backend-Team, Frontend-Team).
- Verify the "App attribute" is still
groups. - Click Save.
Map Google groups to subgroups
- Navigate to the specific subgroup in GitLab
- Example: acme-corp/engineering/backend
- Go to Settings > SAML Group Links.
- Click "Add new SAML Group Link".
- Configure the mapping:
- SAML Group Name: Backend-Team (exact Google Workspace group name)
- Access Level: Developer (or your desired role)
- Click Save. Repeat this process for all subgroups and their corresponding Google groups.
Multi-level access example
Here's how permissions might work across different levels:
Top-level group: acme-corp
SAML Group Links:
- "Company-Admins" → Owner
- "All-Employees" → Minimal Access
Subgroup: acme-corp/engineering
SAML Group Links:
- "Engineering-Leads" → Owner
- "Engineering-Team" → Maintainer
Nested subgroup: acme-corp/engineering/backend
SAML Group Links:
- "Backend-Leads" → Maintainer
- "Backend-Team" → Developer
How permissions inherit and combine
Understanding permission behavior is important:
- Role calculation: At each level, users receive the highest role from all their Google groups.
- Inheritance: Higher permissions at parent levels flow down to child subgroups.
- Independence: Each level calculates permissions based on its own group links plus inherited permissions.
- No limitation: Lower permissions at parent levels do NOT restrict higher permissions at child levels.
Example scenarios:
User A (member of Backend-Team only):
- acme-corp: Minimal Access (from "All-Employees" default)
- acme-corp/engineering: Minimal Access (inherited from parent)
- acme-corp/engineering/backend: Developer (from "Backend-Team" mapping)
User B (member of Engineering-Leads and Backend-Team):
- acme-corp: Minimal Access (from "All-Employees" default)
- acme-corp/engineering: Owner (from "Engineering-Leads" mapping)
- acme-corp/engineering/backend: Owner (inherited from parent, which is higher than Developer)
How the synchronization works
Understanding the mechanics of SAML group synchronization helps you manage the system effectively.
Synchronization timing
- When sync occurs: Group memberships update every time a user signs in via SAML.
- Frequency: Changes are not continuous — they only happen at login.
- Direction: Synchronization is one-way from Google Workspace to GitLab.
- First login: User account is created automatically and groups are assigned.
- Subsequent logins: Existing group memberships are updated to match current Google groups.
Role priority and combination
When a user belongs to multiple Google Workspace groups:
- GitLab evaluates all the user's groups at each level of the hierarchy.
- The user receives the highest role from any of their groups.
- This calculation happens independently at each level (top-level group, subgroups, etc.).
Example:
- User in "Developers" (Developer role) + "Tech-Leads" (Maintainer role) → Gets Maintainer
Automatic role changes
The system automatically handles membership changes:
- User added to a Google group: Role upgraded on next login.
- User removed from a Google group: Role recalculated based on remaining groups on next login.
- User removed from all mapped groups: Reverts to default membership role on next login.
- User added to additional groups: Gets highest role from all groups on next login.
Propagation timing
Be aware of these timing considerations:
- Google Workspace changes: Can take up to 24 hours to propagate, though usually take only a few minutes.
- GitLab sync: Happens immediately when the user logs in after Google changes are live.
- Testing: Have users log out and log back in to test permission changes.
Understanding user lifecycle and edge cases
What happens when you remove a user from GitLab?
Removing permissions only: If you remove a user from GitLab projects but leave their account active and they're still in the authorized Google groups:
- They keep their same account (same user ID and username)
- When they log in via SAML, their group memberships are automatically restored
- They regain permissions based on their current Google group memberships
Blocking the account:
- Account exists but is locked
- User cannot log in even if in Google groups
- Can be unblocked later, preserving all history
Deleting the account:
- Account is permanently removed
- If user logs in again (while still in Google groups), GitLab creates a completely new account
- New account has different user ID with no connection to the old one
Proper offboarding process
To permanently revoke access, follow this order:
- Remove from Google Workspace groups - Prevents authentication
- Block in GitLab - Prevents account recreation and preserves audit trails
- Delete account (optional) - Only if you're certain they won't return
Critical: Removing a user only from GitLab without removing them from Google groups means they can simply log back in and regain access.
Google group membership propagation
According to Google's documentation, group membership changes can take up to 24 hours to propagate, though typically occur within minutes.
Account recreation scenarios
| Scenario | User still in Google groups? | What happens on login |
|---|---|---|
| Permissions removed | Yes | Same account, group memberships restored |
| Account blocked | Yes | Login fails |
| Account deleted | Yes | New account created with new user ID |
| Removed from Google groups | No | Login fails at Google |
Troubleshooting common issues
Even with careful configuration, you might encounter issues. Here are solutions to the most common problems.
Users not being added to groups
Symptom: User successfully logs in via SAML but doesn't appear in any GitLab groups, or appears with only the default role.
Possible causes and solutions:
- Group names don't match exactly
- Check spelling and capitalization in both Google Workspace and GitLab
- Look for extra spaces before or after group names
- Verify the exact name in Google Admin Console > Directory > Groups
- User not actually in the Google group
- Verify membership: Google Admin Console > Directory > Groups > Group > Members
- Remember that nested group membership might not be included
- Groups not configured in SAML app
- Verify the groups are selected in Google SAML attribute mapping
- Confirm "App attribute" is set to
groups(lowercase) - Use "Test SAML Login" to inspect the SAML response
- Timing or cache issue
- Wait 24 hours for Google changes to fully propagate
- Have the user log out of GitLab and Google completely
- Clear browser cache and try again
- User must log in via the SAML SSO URL, not regular GitLab login
User has incorrect role
Symptom: User has access but with the wrong permission level.
Possible causes and solutions:
- User belongs to multiple groups
- Remember: Users get the highest role from all their groups
- Check all Google groups the user belongs to
- Review all SAML Group Link configurations at all levels
- SAML Group Link misconfigured
- Verify the Access Level setting in Settings > SAML Group Links
- Check for duplicate group mappings that might conflict
- User hasn't logged in since changes
- Roles only update when users log in via SAML
- Have the user log out completely and log back in via the SSO URL
- Inherited permissions from parent groups
- Check SAML Group Links in parent groups
- Remember that higher roles at parent levels flow down to children
SAML authentication fails completely
Symptom: Users cannot log in at all, or receive error messages during authentication.
Possible causes and solutions:
- Incorrect certificate fingerprint
- Verify you used SHA-1 format, not SHA-256
- Check the fingerprint has the correct format with colons
- Regenerate using the online tool or OpenSSL command
- Wrong SSO URL
- Double-check the SSO URL copied from Google
- Ensure there are no extra spaces or characters
- ACS URL or Entity ID mismatch
- Verify the ACS URL in Google Admin Console matches GitLab exactly
- Confirm the Entity ID matches between both systems
- User doesn't have app access
- Check User Access settings in Google Admin Console
- Verify the user's organizational unit has the app enabled
- Confirm the app is "ON" for the appropriate users
- Certificate expired
- Check certificate validity dates
- Download a fresh certificate if needed
Groups attribute missing from SAML response
Symptom: Users can log in but group synchronization doesn't work at all.
Possible causes and solutions:
- Groups not selected in Google configuration
- Return to Google Admin > Apps > GitLab > Attribute mapping
- Verify groups are selected under "Group membership"
- Confirm "App attribute" is exactly
groups(lowercase)
- User not in any configured groups
- Only groups the user belongs to are sent in the SAML response
- Add the user to at least one selected group to test
- Configuration hasn't propagated
- Wait up to 24 hours for changes to take effect
- Try logging out of Google Admin Console and back in
- Typo in app attribute name
- The attribute name must be exactly
groups(lowercase) - Even a capital letter or extra space will break functionality
- The attribute name must be exactly
Best practices for managing SAML group sync
Follow these recommendations to maintain a secure and efficient setup.
Security best practices
- Maintain emergency access
- Keep at least one Owner account that uses password authentication (not SAML)
- This provides emergency access if SAML configuration breaks
- Store these credentials securely
- Use least privilege principle
- Set default membership to Minimal Access
- Only grant higher permissions through explicit group mappings
- Regularly review and audit group memberships
- Enable enforcement options
- Turn on "Enforce SAML authentication" options
- This prevents users from bypassing SSO
- Exceptions should be rare and well-documented
- Regular security audits
- Quarterly review of Google Workspace group memberships
- Annual review of SAML Group Link mappings
- Monitor GitLab audit logs for unusual access patterns
Summary and next steps
Congratulations! You've successfully configured SAML SSO and automatic group synchronization between Google Workspace and GitLab. Your setup now provides:
- Seamless authentication - Users sign in with their familiar Google Workspace credentials.
- Automatic provisioning - User accounts are created on first login without manual intervention.
- Dynamic permissions - Group memberships and roles update automatically based on Google Workspace groups.
- Centralized access control - Manage all access through your existing Google Workspace groups.
- Enhanced security - Leverage Google's authentication infrastructure and enforce consistent policies.
- Reduced administrative overhead - Eliminate manual user and permission management in GitLab.
What happens now
When users access GitLab:
- They navigate to your GitLab SSO URL.
- Authenticate using their Google Workspace credentials.
- Get automatically added to appropriate GitLab groups.
- Receive permissions based on their Google group memberships.
- Their permissions update every time they sign in.
Additional resources
- GitLab SAML SSO Documentation
- GitLab SAML Group Sync Documentation
- Google Workspace SAML App Setup
- SAML Certificate Fingerprint Tool
Related article
We want to hear from you
Enjoyed reading this blog post or have questions or feedback? Share your thoughts by creating a new topic in the GitLab community forum.
Share your feedback